
En fågelfotograf blir "rockknäppare", del 2
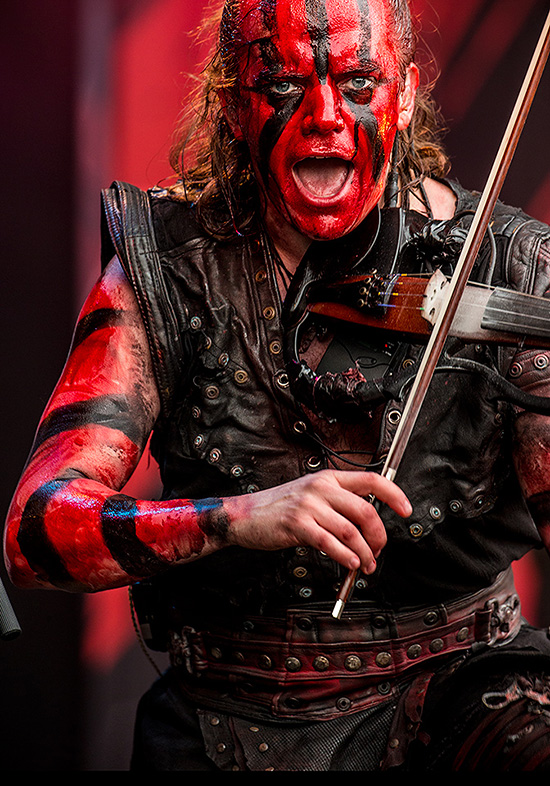
Turisas på Sweden Rock Festival, juni 2014.
EOS-1 DX , EF 200–400 mm f/4 L IS USM vid 400 mm. Exponering: bl. 5,6, 1/250 s., ISO 1600.
Finländska band blandar gärna in folkmusik i power metallen.
Jag älskar svartvitt för rockfotona. Men ibland måste jag kapitulera.
Vissa motiv fungerar bäst i färg.
Mer följer i del 3.
En fågelfotografs "hemliga" projekt, del 1: rockklassiker
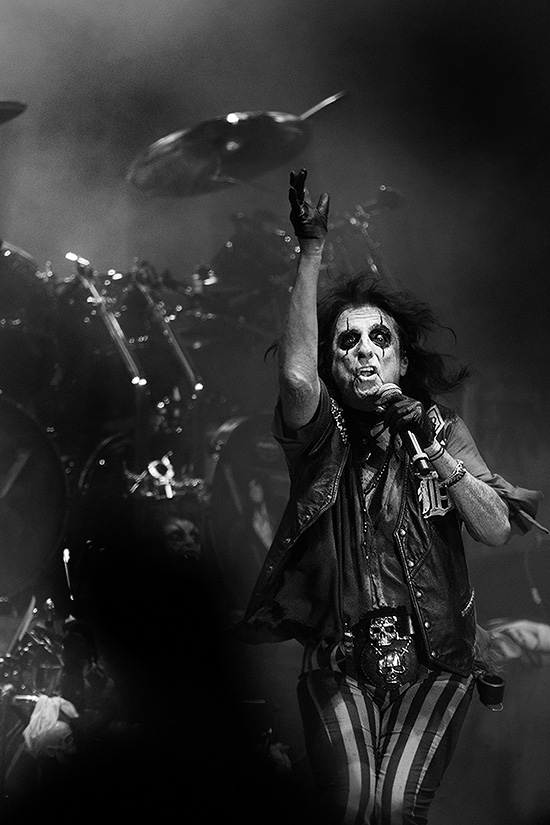
Alice Cooper, Sweden Rock, juni 2014. 70–200 mm L IS II USM plus 1,4 ggr telekonverter vid 280 mm. Exponering: bl. 4,5, 1/1600 s., ISO 3200.
Det är ingen större skillnad på att fotografera fåglar och heavy metal. Jag slipper gömslen i det senare fallet. Sedan i våras tar jag alltid med mig kameran på konserterna, ibland är det systemkameran (när det går) och i andra fall en kompaktkamera, köpte nyligen Canons G1X Mark II för den högre bildhastigheten och kvaliteten på höga ISO-tal.
Ofta blir det svartvitt. Jag fotograferar i både RAW och JPEG, jag ställer in bildstilen i kameran på Monokrom, ökar kontrasten och använder ibland även de inbyggda filtren i bildstilen. Genom att köra både RAW och JPEG får jag en JPEG-fil i svartvitt, som jag kan titta på direkt på displayen. Men skulle jag ångra mig finns färgerna kvar i RAW-filen.
Många föredrar att göra svartvita bilder ifrån RAW-filerna i efterhand. Det kan vara en god idé eftersom jag har större möjligheter att påverka hur färgerna ska förändras till gråtoner med hjälp av olika filtervärden. Men jag föredrar ändå att köra svartvitt i kameran. Varför? Kanske är det bara en smaksak, men jag upplever det som att jag då börjar tänka svartvitt.
För några bilder går jag i efterhand tillbaka till RAW-filerna för att se om jag med en bättre inställning av färgvärdena kan få en bättre bild. Men ofta blir det JPEG-filerna jag använder. Med rätt bildstilsinställningar kan jag få ett ganska bra svartvitt resultat redan vid fotograferingsögonblicket.

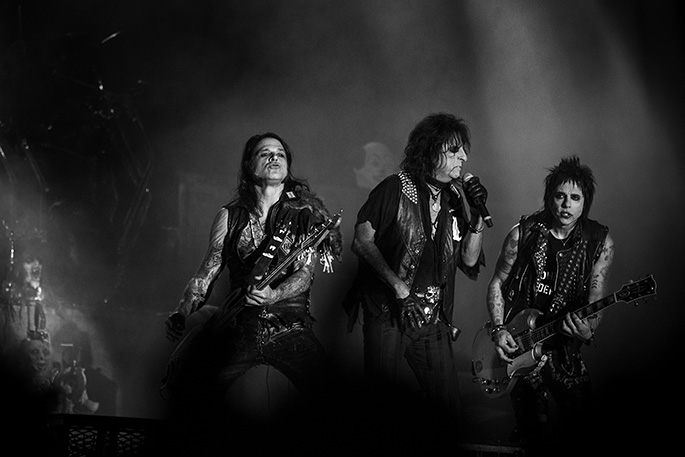
Alice himself och gitarristen Orianthi Panagaris, hon har även spelat med Michael Jackson. 70–200 mm f/2,8 L IS II USM plus 1,4 ggr telekonverter vid 280 mm. Exponering: bl. 4,5, 1/800 s., ISO 3200.

EF 70–200 mm f/2,8 L IS II USM plus 1,4 ggr telekonverter vid 280 mm. Exponering: bl. 4,5,
1/1600 s., ISO 500.
EF 70–200 mm f/2,8 L IS II USM plus 1,4 ggr telekonverter vid 245 mm. Exponering: bl. 4, 1/1000 s., ISO 5000.

70–200 mm f/2,8 L IS II USM plus 1,4 ggr telekonverter vid 280 mm. Exponering: bl. 4,5, 1/125 s., ISO 3200.

EF 70-200 mm f/2,8 L IS II USM plus 1,4 ggr telekonverter vid 280 mm. Exponering: Bl. 4,5, ISO 1/30 s.

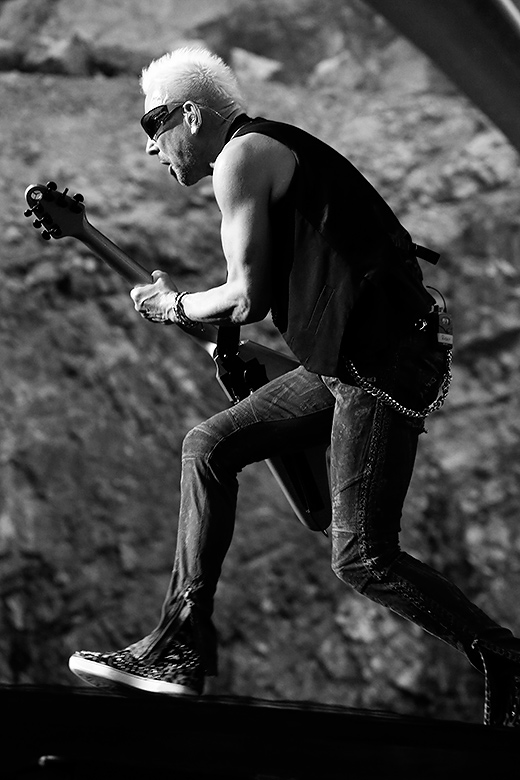
Klaus Meine, Scorpions, Dalhalla utanför Rättvik, juli 2014. En riktig klassiker som kom att
förknippas med murens fall och demokratiseringen i öst: Wind of change.
EF 70–300 mm f/4–5,6 L IS USM vid 108 mm.
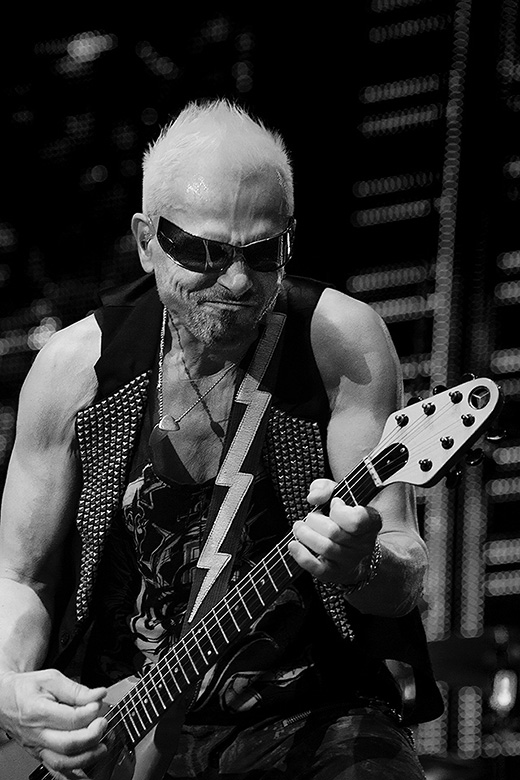
Rudolf Schenker., Scorpions, Dalhalla, Rättvik. EF 70-300 mm f/4-5,6 L IS USM
vid 214 mm.

Pawel Maciwoda är "ny" i bandet, men han har varit med sedan 2003, det vill säga i 11 år. Dalhalla, Rättvik. Scorpions startade 1964 av Rudolf Schenker, Klaus kom med året därpå. Första albumet gavs ut 1972.
Vad är 65 för ålder när man hållit på sedan 1964?
EF 70–300 mm f/4–5,6 L IS USM vid 150 mm.
My 11 top tips if you are going on a special photo journey or on an assignment (to for Example Svalbard in Winter)
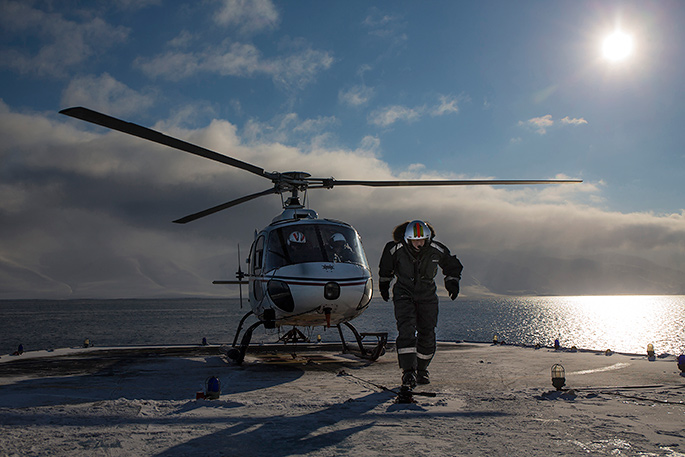
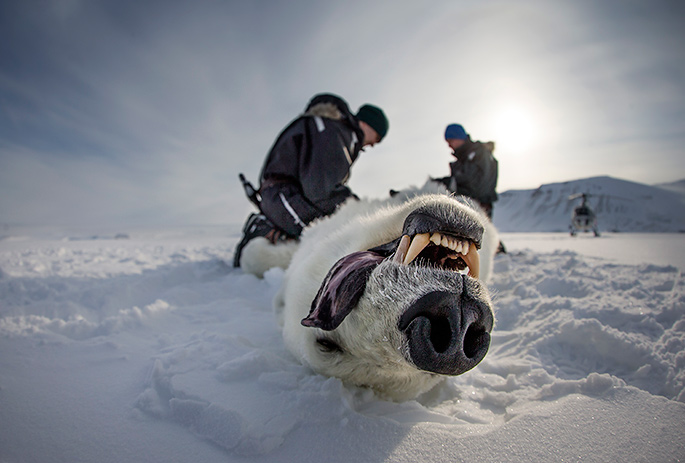
In April I followed the polar bear reseaerchers on board the research ship Lance going around Svalbard. From the platform the helicopter went off with two researchers and helicopter crew searching for polar bears to mark and get samples from.
EOS-1 DX and EF 24–70 mm f/4 L IS USM at 38 mm.
1. Pack in two steps. 1) what you can’t be without, and 2) as much other stuff as possible, because you never know
Packing is one of the most difficult things to do when you are going on a safari or on an assignment. According to Murphy’s Law, you will always need that one lens you didn’t pack. I have completed several photo books using minimal equipment – for example, when I was photographing albatrosses on Midway Atoll in the North Pacific Ocean for a couple of weeks and half of my lenses were stolen from the checked-in-luggage. So it’s possible, but it’s not ideal.
When you go to a new place, you often find you suddenly need that super wide angle lens or the longest of the long lenses that you thought were unnecessary.
If I travel by car, it’s not a problem, as I fill my car with what I may need. But if I fly, I try to take as much as possible in my hand luggage, and if the airline is troubling me, I have a jacket with large pockets. In the hand luggage I put the most important items, such as the charger ( if you go to a remote place, you might not be able to buy a charger if the checked-in-luggage flies to a different destination), a flash, the lenses which I know I can’t do the job without and a small laptop. If I can’t take the longest lens with me on the plane, I take tele-converters at least. In the checked-in-luggage I have all the other things I want to bring with me but which I possibly can do the work without, even though I might miss some opportunities.
As for the checked in-luggage, I first pack my equipment into a soft camera bag, which is then placed inside a hard suitcase. This is how I have avoided damages to my equipment over the last 15 years. If you’re likely to go over the allowed weight limit, it’s often cheaper to simply book an additional check-in-bag in advance.
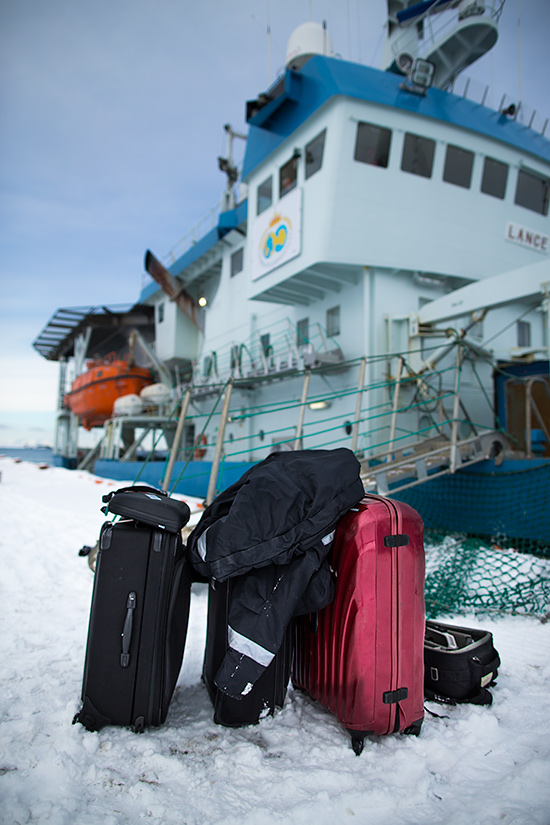
My bags with camera equipment and clothes. I try to keep the most important lenses and camera body inside my handluggage. What I can't get into the handluggage when I am flying I pack first in a soft camera bag, then on the outside a hard suitcase to protect the gear. EOS-1 DX and EF 24 mm f/1,4 L USM. Aperture 2,2.
2. Protect your equipment
If I go to cold places, I stick to water resistant equipment; I only use cameras and lenses, which are sealed, and I try to use camera bodies that I can use for a long time in heavy rain or snow. I keep extra camera batteries inside my clothes near my body to keep them warm. If you don’t have lenses and cameras that can survive the wet conditions, try to bring something to protect them.

I could only follow the researchers in the helicopter during one day. The helicopter is small, and there is just room for the most important lenses. EF 16-35 mm at 16 mm.
3. Image Stabilizer is a great help
I love lenses with the Image Stabilizer technology for journeys, especially when I travel by helicopter or by boat. It is of course even more helpful for long telephoto lenses or zooms. I actually bought the EF 24-70 mm f/4 L IS USM with Image Stabilizer to Svalbard as this feature was more important for me than a one-step brighter zoom lens without it.
4. Zoom lenses are essential in field but don’t forget the fixed lenses with short depth of field
I normally love lenses with a fixed focal length and a wide aperture that can provide me with a very short depth of field and therefore a very blurred and soft background, like the EF 35mm with f/1,4 or the EF 85 mm with f/1,2. But when working in demanding and very cold conditions, the zoom lenses are more versatile and I don’t need to change lenses, which can be a risk during a rain or a snow storm. I’ve used the EF 16-35 mm f/2,8 L II USM for a long time, and I love the new EF 24-70 mm f/4 L IS USM and the EF 70-300 mm f/4-5,6 L IS USM lens when I am out in the terrain or on a boat.
I try to bring lenses with a wide opening with me and I will use them when the conditions allow me to do so. For example, on the expedition to Svalbard I took nearly all the portrait photos of the people working on the boat and in the team with those fixed lenses that gave me a short depth of field and a blurred background.
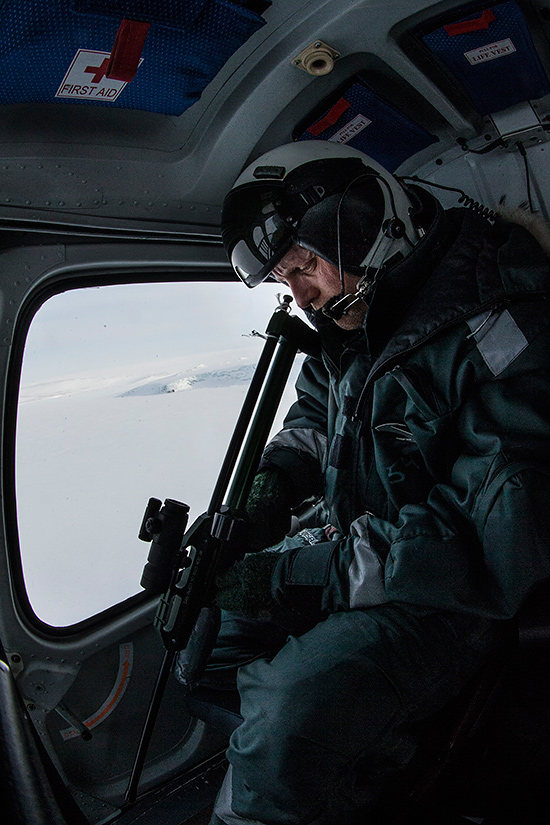
The Norwegian researcher Magnus is loading the rifle with the shot that shall tranquilize the polar bear. As space was small in the helicopter I had to use the fisheye zoom 8–15 mm f/4 at 15 mm. EOS-1 DX.
5. Get up early to catch the warm light and the action
I should have chosen any other occupation rather than being a bird and wildlife photographer as I hate getting up early in the morning. But in the Arctic or very far North, the best light is at nighttime or early in the morning. Also, wildlife, and especially birds, are more active in the morning. So if I want to get the shots, I need to go against all natural instincts and common sense to get up absurdly early.
From that perspective, it’s easier to go to remote places in Africa or Central America, where the sun at least has the sense to give me eight to nine hours of sleep.
The researchers taking blood samples from the tranquilized polar bear. EOS-1 DX and EF 8-15 mm fisheyezoom, at 15 mm (which is the choice for a fullformat sensor camera if you don'ät want vignettin). If you keep the horizon in the middle you will get it rather straight and not curved as otherwise.
6. Embrace bad weather
There is nothing like bad weather for photography. Of course when you work for a firm or a commercial agency, they usually want to have photos where the weather seems to be nice with sunshine, etc. Photos taken in good weather of course produce nice feelings in those looking at them. But some of my best photos are taken when the weather has been the worst you could think of. Heavy rain or snow storms make great action, and sometimes dark photos can be very effective and dramatic. So instead of going to rest when the weather goes bad, try to make something of it instead.

The chief researcher Jon writes the weight after they have weighed the polar bear male. Shooting in backlight is a favourite for me. To keep the background sky from burning out its highlights you need to underexpose a bit, then you use either a flash for lightening up the people or you do as you did in the old B/W darkroom, you enlighten the shadows a bit. EOS-1 DX and EF 16–35 mm f/2,8 at 17 mm.
7. Keep moving for new perspectives
Always try new angles. Move around to see if there is a more interesting angle. Try to think of the background when you work with birds or mammals. The background can be nearly as important as the subject. A bad background can ruin a shot even if your main subject is perfect. Sometimes just a few decimetres or a metre can make a difference.
Also, when possible, try wide angle. Go close without disturbing the subject. If you are on a boat, the options may be limited, but at least try to see if you can move somewhere else or shoot from a low or high position.

Chief researcher Jon back in the helicopter, backlight is my favourite. EOS-1 DX and EF 24–70 mm f/4 L IS USM, at 24 mm.
8. Sun direction
If you have sun, don’t just shoot with the sun behind you. Of course, those are the most sought after photos by commercial agencies, as sunshine is often wanted in advertising shots. But very often a backlit photo is more dramatic, so use your flash to enlighten your subject if you don’t want it to get too dark.

One of my favourite portraits of the helicopter engineer always following the helicopter.
EOS-1 DX and EF 24–70 mm f/4 L IS USM, at 28 mm.
9. Try not to harm
Be careful, but not only because some animals can be dangerous. Instead, think of yourself as an intruder and try not to disturb birds or wildlife in a way that can harm them. We should try to be at least a bit humble when we are entering other animals’ worlds.
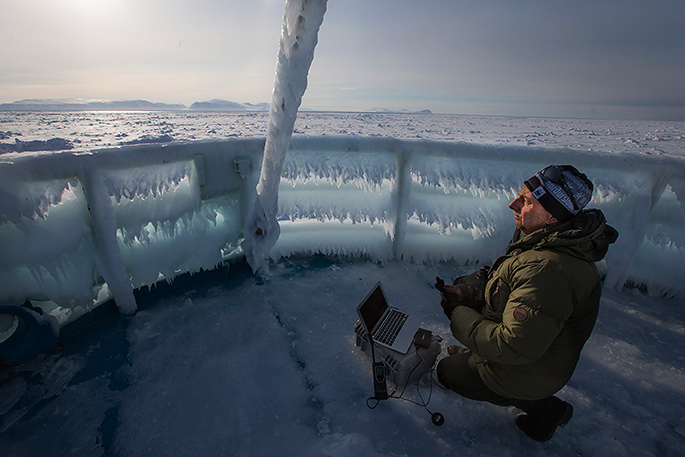
 Guillermo from WWF Spain working on his daily blog telling about the journey and the situation for polar bears and climate change. Shot with 50 mm f/1,4 at nearly full opening f/1,6 to get him sharp and the background blurred.
10. Wind direction is essential
When working with wildlife, the wind direction is essential. Always consider it, especially if you have the option to change your position. In windy conditions, you must remember that working with mammals is the complete opposite to working with birds. When shooting birds, you should always try to have the wind behind you, in your back. The reason is that birds do everything AGAINST the wind; from starting and landing to mating and cleaning themselves while keeping the balance on branches turned against the wind. Therefore, in order to have the front of the bird pointed at you, you need to have the wind from behind you.
When working with large mammals, it’s exactly the opposite. If you have the wind from behind you, a wolf or deer will hear and smell you from a distance and you will never get any good shots. But if you have the wind coming from the direction where you have the animal, they might come very close to you if you keep still.

The captain on the ship Lance. Shot with 24 mm f/1,4 L USM at full opening f/1,4 to get the background blurred and the focus on the captain.
11. It’s not a competition
I wouldn’t work as wildlife photographer if I didn’t think it was fantastic fun and if I didn’t learn a lot from it. Never let your wildlife photography become a competition. Competing can, if we are not aware, lead us to go too far, or it can influence others to do so. We are guests who are here to document a world and save it for other people; we can maybe influence at least some people to think more about what harm we are doing and try to do something against it.
Tom Arnbom from WWF Sweden sent the WWF blogs and the photos I took daily to WWF Canada, then the photos and the blogs were distributed to WWF in different countries and published. Some of the photos I took were used just two days later as full page advertizes in different papers in Sweden and elsewhere. EOS-1 DX and EF 16-35 mm f/2,8 L IS II USM at 16 mm.
